When working in a Change Management Project, you will be spending most of your time in Views and Charts. This is where you can view a project's issues in an organized way using views that you and/or administrators of the project define for the specific needs of the project. To see the available public and private views in a selected project, expand the view selection menus to the left. In the below example, the Public Views menu has been expanded and the "All issues" view selected. The defined view that is selected is displayed in the middle pane and, when you select an issue there, the Issue editor view opens to the right.

This article explains how to create a new issue view.
Prerequisites
- You must have "Write" access rights to the CMS project to create private views
- You must have "Change" access rights to the CMS project OR the Administrator role in the server to create public views
Creating Public and Private Issue Views
Private views are created by you and are only visible to you.
Public views are created by project administrators, and are visible to all users with access to the project.
- To create a private view, right-click on the Private Views menu option and select New Private View. To create a public view, right-click on the Public Views menu option and select New Public View.
- Regardless of whether you are creating a private or public view, the Define View dialog will display.


- Enter a Name for the view. This name will display in the view selection menu.
- Enter an optional Description.
- Enter a Definition for the view. A complete list of CMS view definition XML tags can be found in the swExplorer Reference Manual in the application Help, but the basics are described below.
Basic CMS View XML Definitions
The view content and disposition is defined according to the following XML syntax. These definition tags can be in any order within the <View> tag.
<View>
  <Columns/>
  <Iterations/>
  <Filter/>
  <GroupBy/>
  <Options/>
</View>
<Columns/>
Defines the column layout of the issues of the view. Columns is an optional tag, but an empty Columns definition will generate a view listing the names of the issues. All column tags have the following optional attributes:
- width: The width of the column expressed in points. The default value is 120 points.
- align: The alignment of the cell values. Valid values are: left, center, right. The default is left.
Note: Column definitions, such as <ItemNameColumn/> and others used in the context of an item, part or node will not work with issues in CMS. Only the above described <Columns/> is applicable. |
Refer to CMS Column definition in the application Help for details.
<Iterations/>
This tag is optional, and implements the use of grouping by development Iterations so that issues are listed according to the iteration they are allocated to. See How to Use Iterations in Project Views for an example.
<Filter/>
This tag is optional, and defines which issues in the project that should be included in the view. An empty Filter element means that all issues will be listed. Refer to CMS Filters in the application Help for details.
<GroupBy/>
This tag is optional, and defines how the listed issues should be organized in the view. Refer to Group By clause in the application Help for details.
<Options/>
This tag is optional, and offers additional adaptations of the view. Refer to View Options in the Help for details.
Including Information About Referenced Items
Issue views can also include information about the items that issues are linked to. For example, you can include the name for referenced items using <RelationshipRefColumn type="" />. It will return the names of items with a relation to the issues in the view for the relationship type noted. To include attributes for the referenced items, you can use a <TextColumn> and axis /objref::IR which allows you to go from issue to item using the default IR type of Item Reference (if you create your own reference type, you would need to replace IR with your custom type). The value after the @ in the below example is the attribute SID.
Example View XML
<View>
  <Columns>
    <IssueIDColumn align="right"/>
    <NameColumn width="200"/>
        <RelationshipRefColumn type="IR" width="200"/>
        <TextColumn caption="Req ID" width="100">#{? /objref::IR.Select(@IDTEST)}</TextColumn>
  </Columns>
  <Filter>
  </Filter>
</View>
Example Result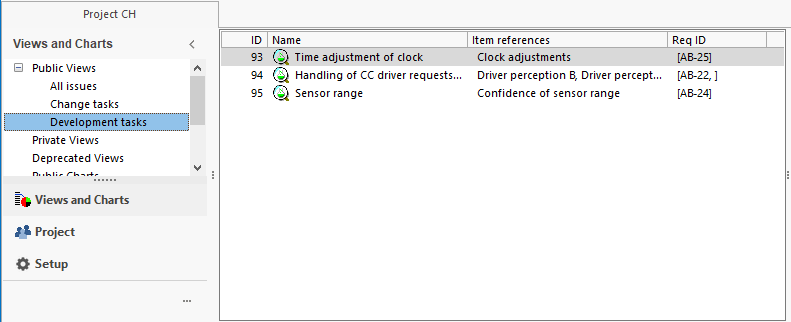
| Note: You have to do a /objref:: for each relationship type that you are interested in including. If you don't want separate columns, you can consolidate into one by using "(/objref::NREQ union /objref::IR).Select(AncestorHandle)" |
Including Information About Linked Issues in a Grid
It is also possible to access linked issues in a grid that is defined for an item. See How To Include Issue Information in Configurable Grids for an example.
What's Next?
Read more about Project views and CMS column definition options in the swExplorer Reference Manual in the application Help.