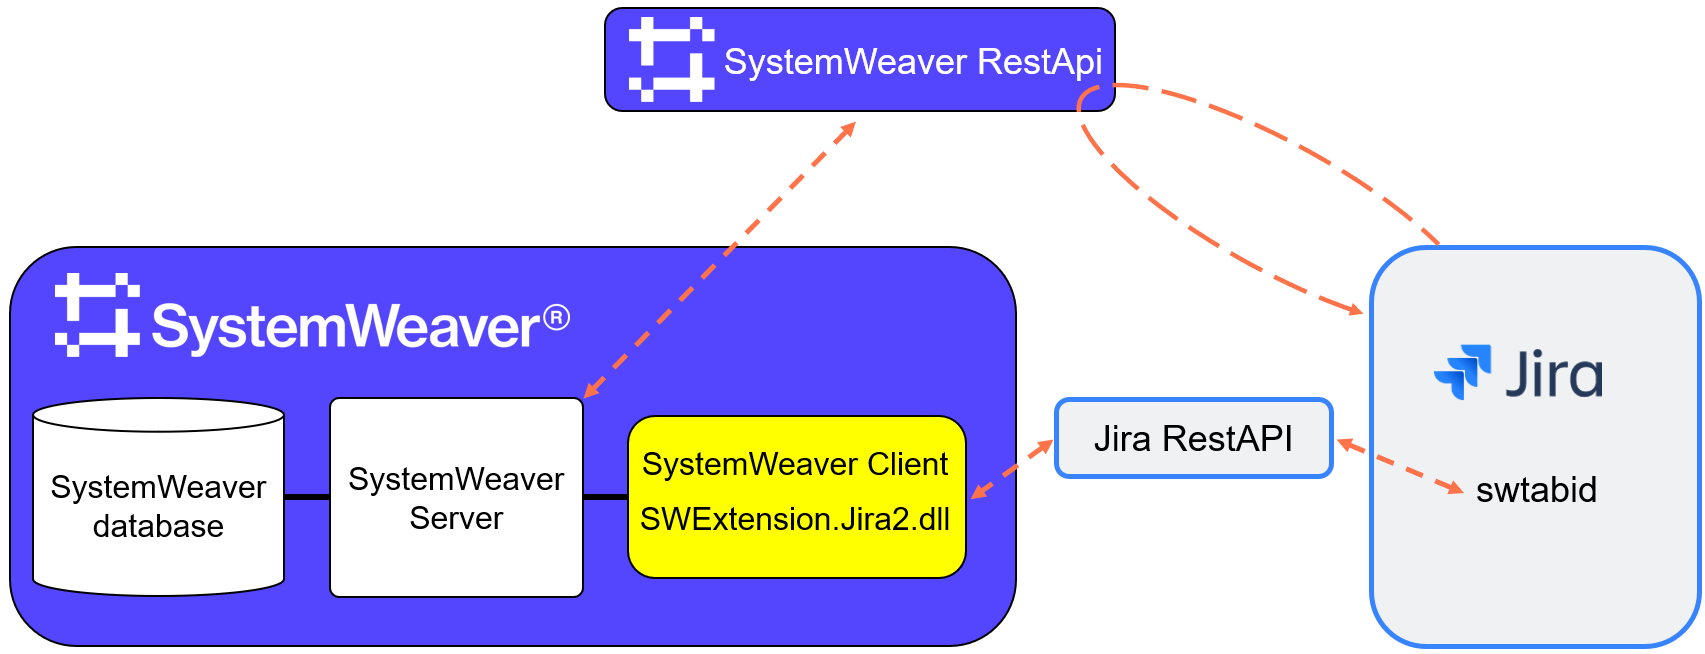
The integration between SystemWeaver and Jira involves, among other things, the use of a SystemWeaver client extension view file called SWExtension.Jira2.dll.
This article describes how to configure the view, and which client files users will need.
Prerequisites
- Familiarity with your Jira installation and projects
- Assignment of the SW Architect role in the SystemWeaver database
- An installation of the SystemWeaver swExplorer client
- The SWExtension.Jira2.dll extension file is located in the Client's swExplorerExtensions directory
Configuring the Extension View
The extension needs to be configured by an SW Architect user using the swExplorer client.
After logging in, click on File > Configure the explorer.

A list of available views will display on the Item views tab. If the SWExtension.Jira2.dll extension file has been correctly placed in the swExplorerExtensions folder, you will see Jira in the list.

- Select the Jira item view entry.
- Click View example XML and copy the example Jira XML as a starting point for your configuration.
- Click Edit configuration and paste the configuration in the Edit XML window.
- Modify the configuration to meet your needs. (See the Explanation of the Configuration Elements below.) It should look something like the example provided.
- When you are ready to activate the extension, check the Active box.
Explanation of the Configuration Elements
You can add several Jira instances inside the <Jiras> tag, each within its own <Jira> tag. In the below example, there is one Jira server involved in the SystemWeaver integration.
Within each Jira instance <Jira> tag, enter the following:
- <Name>: a descriptive name for the Jira.
- <BaseUrl>: the base url and port for the JIRA instance
- <MainProject>: the project used the most.
- <ValidProjects>: The projects to be included in the integration. This is optional and only useful when there are many projects in your Jira which will not be integrated with SystemWeaver. Those projects will not load in the project selection list. For each Jira Project that you want to make available in the swExplorer, enter the project's key in a <ProjectKey> tag. The value should be the Key for the Project.
- <Customfield>: the custom field created for SystemWeaver items.
- <Relationship>: the relationship type between SystemWeaver's item and Jira's issues. The Floating attribute specifies if the relationship can be set to "float" forward to newer versions of an item or not. Possible values are "True" or "False". When set to "True", users will see the option for a Jira issue and can make the selection they want when viewing an issue, or when creating a new one.


- <Epic>: information for the Epic issue type if Epic is used. See Epic Issue Typefor how to retrieve this information.
- <EpicTypeId>: the id for epic type.
- <CustomField>: the custom field that is used for Epic Name.
- <EpicName>: a value that will be used for the Epic Name.
Outside of the <Jira> tag, set the following:
- <ServerCode>: Enter a SystemWeaver server code. In the below example, the code is SW. Note: This code must match the SW Server code field in the swtabid plugin configuration if you are running a local Jira server.
- <ItemType>: the SIDs of the item types for which the Jira view will be available. Several item types can be used and separated by a comma, e.g., "RBFN,RQ,JTCS". If you want to activate the plugin on all item types, use the item type SID "I".
Example
<JiraConfiguration>
  <Jiras>
    <Jira OverrideScreenSecurity="False">
      <Name>Jira1</Name>
      <BaseUrl>http://srv-app-01:8080</BaseUrl>
      <MainProject>ADLV3</MainProject>
      <CustomField>customfield_10007</CustomField>
      <Relationship Floating="True"/>
      <Epic>
        <EpicTypeId>10001</EpicTypeId>
        <CustomField>customfield_10004</CustomField>
        <EpicName>Epic issue</EpicName>
      </Epic>
    </Jira>
  </Jiras>
  <ItemType>RBFN,RQ,JTCS</ItemType>
  <ServerCode>SW</ServerCode>
</JiraConfiguration>Required Client Files
SWExtension.Jira2.dll
The SWExtension.Jira2.dll file should be placed in each user's Client installation in the swExplorerExtensions folder.

It provides users with a Jira view in their swExplorer client.

swExplorerLauncher
In addition, the swExplorerLauncher is needed for users to be able to redirect to the SystemWeaver application from Jira when clicking on an item name in Jira. Alternatively, users can copy the link address to their clipboard.
