The SystemWeaver Jira integration is a plugin that offers a solid integration between your SystemWeaver database and your Jira tool making it easy to switch between the two applications with just one click. In this article, we'll describe how to use the SystemWeaver Jira integration.
- Viewing all Linked Jira Issues
- Redirect to Issue in Jira
- Viewing All Linked SystemWeaver Items in Jira
- Redirect to Item in SystemWeaver
- Working with Jira Issues in SystemWeaver
| Note: The integration does not involve replicating Jira data nor is it meant to replicate Jira functionality in SystemWeaver. Jira data is simply retrieved and displayed in SystemWeaver and vice versa. If you are interested in learning about SystemWeaver's own built-in issue system, see Change Management System (CMS). |
Prerequisites
- An installation of the SystemWeaver swExplorer client
- The SystemWeaver SWExtension.Jira2.dll client extension is located in the Client's swExplorerExtensions directory
- The SystemWeaver Jira integration has been installed, activated and configured by an Architect/IT Admin
- The SystemWeaver swExplorerLauncher application is registered on user's machine (required for redirects from Jira to SystemWeaver)
- You are logged in to Jira via SystemWeaver
Viewing all Linked Jira Issues
When you load the Jira view for an item type for which it is configured, you will be taken directly to the Issues tab. If you are logged in to Jira via SystemWeaver's Jira view, the Issues tab will provide a list of all Jira issues linked to the selected item for the Jira instances that you are currently logged in to. The following issue information is retrieved from Jira and displayed:
- Jira (The name of the Jira instance)
- Project
- Id
- Floating
- Type
- Priority
- Status
- Assignee
- Reporter
- Created
Current Issues for Selected Item

You can sort the issues by clicking on the column headers and can rearrange the columns. However, all sorting and column order changes apply only to your current session and are not saved.
In the above example, the user is currently logged in to three Jira instances - Jira1, Jira2, and JIRA Cloud. The selected requirement item "No drag" has Jira issues from both Jira1 and Jira2. Note that if the user was only logged in to Jira1, they would see the issues from Jira1 only. The issues from Jira2 would be hidden from view.
| Tip: If your organization has more than one instance of Jira configured for use with the extension, be sure you are logged in to all instances if you wish to see all of the linked issues. |
Redirect to Issue in Jira
By double-clicking on an issue in the Issues list, you are quickly redirected to the full record display of the issue in Jira.

| Note: If you are not currently logged in to your Jira application, you will be prompted to log in. |
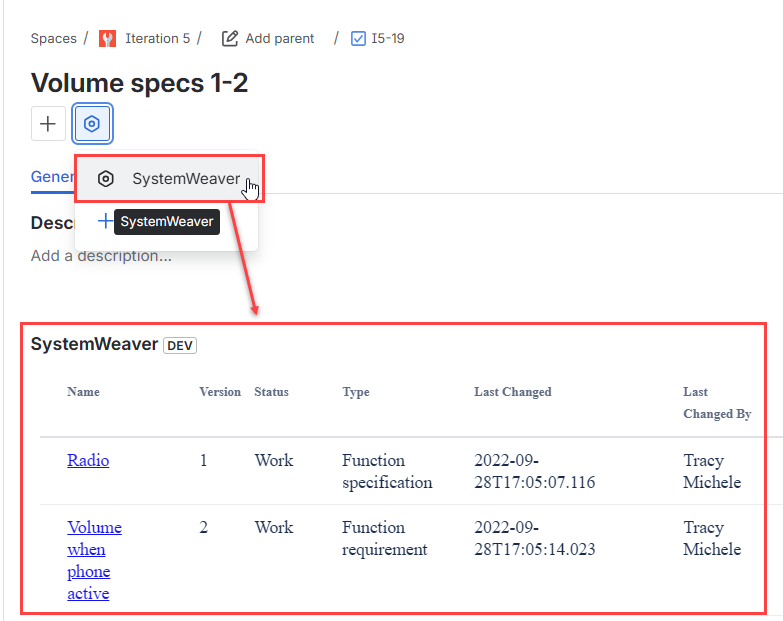
Viewing All Linked SystemWeaver Items in Jira
This section describes where in Jira you can view the linked SystemWeaver items for a selected issue.
Jira Cloud
Click the SystemWeaver button. Depending on your version of Jira, the button may look different.

Jira Server
Click on the SystemWeaver tab in the Activity section.

A list of all linked items will display along with information such as name, and, e.g., version, status, etc. In the above example, the "Low speed emergency braking" issue has four linked items in SystemWeaver. The type of item information provided is, to some degree, configurable by a Jira administrator.
| Don't see a SystemWeaver linked items listed? Contact your Jira administrator to confirm configuration. |
Redirect to Item in SystemWeaver
Redirecting from an issue in Jira to a linked item in SystemWeaver is simple. This requires that swExplorerLauncher has been registered on your machine.
If using a local Jira Server installation, to open the linked item in a new tab in SystemWeaver, left-click on the hyperlinked Name on the SystemWeaver tab in Jira.

If using Jira Cloud, press Ctrl+Shift and click on the hyperlinked name, the swExplorerLauncher will redirect you to the item in SystemWeaver.

Whether it opens in a context or in a new tab will depend on whether the Jira issue was created within a context or not.

| Note: If you are not currently logged in to your SystemWeaver server, you will be prompted to log in. |
Working with Jira Issues in SystemWeaver
The Jira view enables you to search for, open, and trigger the creation of Jira issues as well as link items to Jira issues, and update an issue's Epic link directly from SystemWeaver. This is done on the Jira tab in the view. The information in the top section of the tab is retrieved directly from Jira. The Items section in the bottom half of the tab displays a list of the items that are currently linked to the issue Id displayed in the top section.
| Tip: When you are working from this Jira tab, it is helpful to treat it as if you are working directly in the Jira application. The focus of the tab is the Jira issue and not the SystemWeaver item. For example, although the user has the "Break for obstacle" requirement selected in the tree shown below, it is unrelated/not linked to the "ADLV3-127" issue that is in focus/selected on the Jira tab. The "ADLV3-127" issue has only one item linked to it ("Maintain cruise speed") and it is not the selected item in the tree. |
To work with Jira issues in SystemWeaver, you must first select a Jira instance in the Current Jira drop-down field on the Jira tab. (Operations are only conducted against one instance of Jira.)

Searching for an Issue
To search for an issue in the selected Current Jira instance, enter a Jira Issue ID in the Select Jira Issue text box and click Select issue. The issue information will load as shown in the above example.

Your search is across the entire Jira instance and is not restricted by which item you have selected in the tree.
Opening an Issue
After searching for an issue, you then have the option to open the issue in the Jira application. To do this, click Open Issue. Again, you must first have the issue "loaded" to the Jira tab like "ADLV3-86" shown below. You will be redirected to the full record display of the issue in the Jira application.

Creating an Issue
The Jira view enables you to initiate creation of Jira issues from directly within SystemWeaver. While searching and opening issues via the view is unrelated to which item you have selected in the tree, the Create Issue option will allow you to create an issue and link it to the selected item.
- Select the item for which you want to create an issue.
- On the Jira tab, click Create Issue.
- In the pop-up dialog, choose a Jira Project and Issue type.
 Note: Only projects configured for use with SystemWeaver will be available for selection.
 - If the Floating option is available, and you want the issue to also "float" forward and be linked to new versions of the selected item that may get created, check the Floating box to turn floating on for this issue. If you do not check this box, the issue will not be linked to any later versions of the item that may get created.
If Floating has not been configured for the view, the option will not be available. - Click Create Issue. You will be redirected to your Jira application to finish creating the issue.
Creating a Sub-task
It is also possible to create sub-tasks in Jira using SystemWeaver.
- Select the item in the structure tree that you want the sub-task to be linked to.
- Select the Jira issue (as described above under Searching for an Issue) which the new issue will be a sub-task of.
- Click Create sub-task.

- In the Create sub-task dialog, select the Project, and type of Sub-task
- If the Floating option is available, and you want the sub-task issue to also "float" forward and be linked to new versions of the selected item that may get created, check the Floating box to turn floating on for this issue.
- Click Create sub-task.

The new sub-task issue will be created in Jira as a sub-task to the selected Jira issue, and simultaneously be linked to the selected item in SystemWeaver.

Note: Sub-tasks cannot be created for sub-tasks as shown in the below example. The option will be grayed out.
|

Changing the Floating Option
You can change the Floating setting on a Jira issue at any time.
- Select the Jira issue so that it is loaded to the Jira tab.
- Make your change to the Floating setting.
- Click Update issue.

| Note: If you wish to change the setting from "True" to "False", this will result in the Jira issue being linked to the original item only. Later versions of the item will be unlink from the Jira issue. In other words, it removes any previous "floating". |
Linking an Issue to SystemWeaver Items
When creating a new Jira issue, you are simultaneously linking it to the selected item in the tree. The view also enables you to link an existing Jira issue to one or more items.
- Search for the Jira issue so that it is loaded to the view as ADLV3-146 in the above example.
- Next, select the SystemWeaver item that you want to link the issue to. When you do this, the item will appear in yellow in the Items section of the view. In the below example, ADLV3-146 is loaded to the view (it already has one item linked to it called "Brake for obstacle-straight") and the "Emergency braking" item has been selected in the tree:

- Additional items can also be selected in the same way.
- When you are ready to perform the link of the items to the issue, click Update issue to the far right. The items staged for linking are now linked to the issue in Jira. You will receive a confirmation that the issue was updated.

Update Epic link on a Jira Issue
By selecting a Jira Issue and clicking Update Epic link, an Epic link can be changed or added.
- Select the Jira Issue for which you want to add or change the Epic link. In the below example, Jira issue ADLV3-35, a Story issue, is selected.
- Click Update Epic link.
- In the dialog, enter the ID of the Epic which should be linked to the selected Issue.
- Click Update Epic link to confirm the action.

The Epic can now be found in the Epic Link property of the issue on the Jira tab.
To clear an Epic Link, follow the same steps described above, but clear the ID in the Update Epic link dialog and click Update Epic link.
Removing Items from a Jira Issue
At any time, you can remove one or more SystemWeaver items from a selected Jira issue.
To do this, right-click on the item(s) and select Remove from list, and then click Update Issue.

Multi-select is supported by clicking while holding down the Shift key (for selecting adjacent items) or Ctrl key (for selecting non-adjacent items).
| Note: It is currently not possible to delete issues in Jira using the SystemWeaver extension view. |