Importing a ReqIF file into SystemWeaver is a multi-step process. First, you must define how the ReqIF metadata shall be mapped to the SystemWeaver meta model. Then, using a ReqIF conversion tool, you map the ReqIF metadata to defined item types, part types and attributes in SystemWeaver. We can provide a ReqIF tool which handles ReqIF versions 1.0.1, 1.1 and 1.2. The conversion tool generates a SystemWeaver XML that you can then easily import to SystemWeaver using the swExplorer client. It handles all versions that support the SystemWeaver 4 XML format.
Prerequisites
- You have read Overview of Requirements Exchange with SystemWeaver.
- Familiarity with SystemWeaver concepts such as Items, Parts and Attributes
- Familiarity with your system's meta model
- An installation of the ReqIf Importer.exe application
- Microsoft .Net framework version 4.6 or later is installed
Preparing for Conversion
Selecting ReqIF File(s) and Setting Options
- Open the ReqIf Importer.application.
- Enter your Server, Port and login credentials and login to the server.

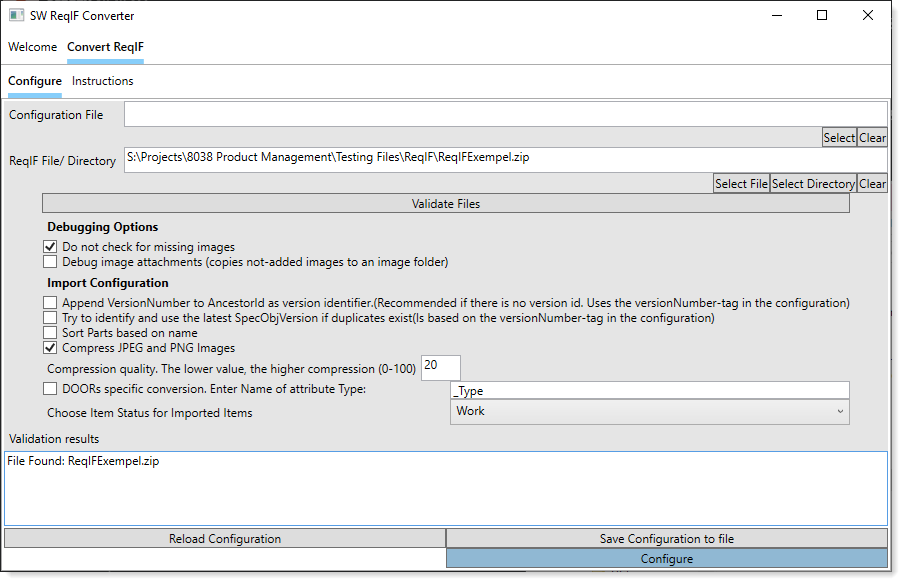
- On the Configure tab, enter the following information:
- For Configuration File, navigate out to the existing configuration file if there is one. If you do not have an existing configuration file, you can leave this field blank. You can create a new configuration file as part of the configuration process as described below in Saving New Configuration File.
- For ReqIF File/Directory, use the Select File button to select a single .reqifz or .zip file containing the .reqif file. For import of multiple ReqIF files, use the Select Directory button to select the directory that contains the files.
- Select any desired Debugging Options or Import Configuration options:
- Default selection(s): Do not check for missing images.
- Append VersionNumber to AncestorId as version identifier option: The ReqIF standard does not support versions. Their objects only have lifetime identifiers, similar to SystemWeaver's ancestor IDs. There is no option to configure IDs or ancestor IDs in the ReqIF converter since it uses the identifier as specified in the ReqIF standard. However, if the ReqIF files contain an attribute for the Spec Objects version numbers, this option will include the version number as a version identifier to be able to define a version-specific ID in the generated SystemWever XML files. This will result in the Item Id being suffixed with the version number. A prerequisite for this, however, is that the "versionnumber" property is defined for that attribute type (this is described further down in Mapping to Item Property under Mapping from ReqIF to SystemWeaver.)
- Image compression: There is an option to compress JPEG and PNG images (note that PNG images are actually converted to JPEG). This is saved in the configuration with everything else. When the image compression option is selected, enter a Compression quality.
- Choose an Item Status for the imported items in the drop-down. Options are: Work, Frozen, and Released.
Conversion Analysis


If the validation is unsuccessful, we recommend that you contact the exporter of the ReqIF file to obtain a valid XML.
Mapping From ReqIF to SystemWeaver
- Once you have completed your setting selections, click Configure at the bottom right of the tab.
- If no existing configuration file was loaded initially, you will receive a No configuration file selected dialog. Click OK, enter a name for the conversion file and select a location for the file. Click Save.
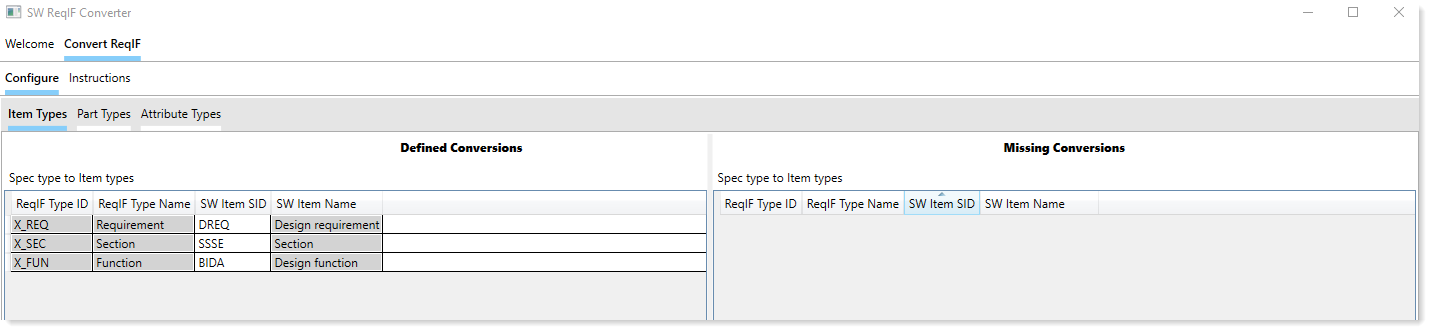
- The Missing Conversions pane to the right will indicate which conversion mappings are missing, i.e., need to be defined or ignored.
- Finalize the mapping as described below.
The configuration is done on three different sub-tabs: Item Types, Part Types and Attribute Types.

The Item Types sub-tab concerns the mapping of ReqIF SPEC-OBJECT-TYPE:s to item types in SystemWeaver.
The Part Types sub-tab is concerned with the mapping of ReqIF SpecHierarcy and SpecRelation to part types in SystemWeaver.
Finally, the Attributes Types sub-tab maps attribute types in the ReqIF file to SystemWeaver attribute types.
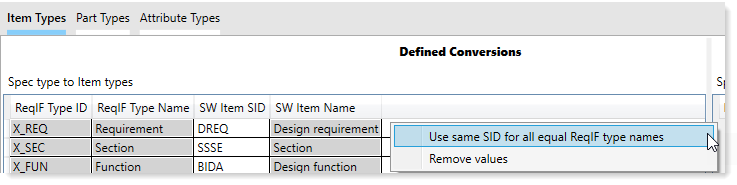
Each of the types identified in the ReqIF file can be converted to types in SystemWeaver. Types without a defined mapping to SystemWeaver types will be ignored upon conversion.In order to identify the part types from the SpecHierarcy and SpecRelation, the conversion of SPEC-OBJECT-TYPE:s to SystemWeaver item types must first be performed. Based on this, the part types can be identified and a conversion specified. To complete the item type mappings, enter a valid type SID from the SystemWeaver database in the SW item SID column for each ReqIF Type ID in the ReqIF file.
Example of entering SW Item SIDs for Item Types

Example for Part Types that have been defined


Attribute types in the ReqIF file can also be mapped to properties in SystemWeaver such as item name, version, and description text (these can be found on the Instructions tab in the conversion tool).
Mapping to Item Property
For attribute types, you have an option to map a ReqIF attribute type to an item property instead of to a SystemWeaver attribute type. To do this, right-click on the attribute row and select Set property. Select the property that you wish to map the ReqIF attribute type to.

Instructions Tab
See the Instructions tab for keywords when configuring attributes.
Saving Configuration and Performing the Conversion
- When you have finished mapping the ReqIF types to SystemWeaver item, part and attribute types, click Save Configuration to file to save the configuration file. The saved configuration file can be used for future conversions.
- When you are ready, click Convert to complete the conversion.
- Select a location for the output and click OK.
- Select a ReqIF Save Location for the output and click OK.
- Click Run Conversion. This generates a SystemWeaver XML file.
What's Next?
The SystemWeaver XML file can be imported to SystemWeaver using the swExplorer client.
| Tip: Do an initial import into a "test" library so you can easily delete the data if needed. |