The purpose of the Coverage view is to keep track of and manage the relationships between 2 different structures. This is done by mapping the items in the left-side structure (Primary) against items in the second, right-side, structure (Secondary). This article describes how to work in the view.
- Getting Acquainted with the View
- Mapping Items
- Removing an Existing Mapping
- Fixing Right Side Version
- Fixing Left Side Version
- Excluding an Item
- Filtering Options
- Handling Faulty Mappings
Prerequisites
- Familiarity with SystemWeaver concepts such as Items, Parts and Attributes
- An SW Architect has configured and activated the view via Configure the explorer
- You must have write access to the structure where the mappings are being created
Getting Acquainted with the View
The view is accessible via menu options on the ribbon that have been configured by an Architect. An option becomes available when an item is selected for which the view has been configured.
Example Menu Options

They are also available via the View drop-down in the Mapping section at the bottom of the list.
The view includes two separate tabs - List view and Structural view.
Structural View
The Structural view shows the items in the left and right structures. The primary structure is to the left and the secondary structure is to the right.

The left pane is resizable by grabbing and dragging to fit your structure viewing needs.

The structures on the left and right sides in the view are configurable. In general, they will be presented as a Context Tree, Grid or Structure Tree.
Context Tree
Uses a SystemWeaver context as a basis for building a tree.

Grid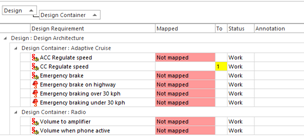
Structure Tree

The column with highlighting is the Indicator column. What is shown here is dynamically dependent on what is the focused item in the other tree. Specifically, it shows those item in the tree which are mapped to the item focused in the other view.
The Name column shows the item name.
The Mapped column shows the mapping status. It shows whether the item on the row is mapped or unmapped, or if there are any version inconsistencies. The item can also be excluded from the mapping.
- If the background color is gray, the item on the row is not a mappable item. Most often these are grouping or structure items.
- If the background is white, the item is mapped.
- If the background is white with the text "Excluded", the item is excluded in the mapping.
- If the background is red with the text "Not mapped" (or similar as this message is configurable), the item is not mapped.
- If the background is yellow, with the text "Version x => y", the item that is mapped has another version than that in the actual structure.
The To column shows how many unique items that the item is mapped against.
- If the background is yellow, the item is mapped against at least one item with version inconsistency in the mapping.
- If the background is white with the number 0, the item is excluded, and therefore mapped against "0" items.
Description
Above Faulty Mappings, the Description of the selected item in the view above is displayed.

Faulty Mappings
A list of faulty mappings is displayed at the bottom of the Structural view. This pane can be resized or hidden on-the-fly.

List View
The List view shows all the items in the first structure and the items in the second structure in lists next to each other. Basically, when you select a mappable item in one structure, a view will be shown which lists the item(s) in the opposite structure.
Top Item Selected
At the top level, only the unmapped right-side items will be listed to the right.

Right-side Item Selected
Selecting a right-side item further down in the tree will provide the option of displaying left-side items not mapped here, and vice versa.

Show Structure
If configured, you may see a Show structure option. It enables showing the structure when selecting a right-side item type in the main tree structure.
Include Functional Requirements Not Mapped Here
This option that allows you to view functional requirements not mapped to the selected right-side item and the list view provides an option to map them.
Mapping Items
To map a left-side item to a right-side item in the Structure view, select the two items and click Map. One single mapping can be done at a time using the Structure view.

One of the advantages of using the Structural view to map is that you can enter a Mapping Rationale right there via the view by simply clicking in the box and typing or double-clicking in the box to open the Description Editor. The Mapping Rationale is added to the Description of the mapping item.

You can also map using the List view in a couple of ways. At the top level, you can copy one or more right-side items in the Unmapped list.

Or, copy one or more from the main tree.

And, then map them to the left-side item using the Map here option on the right-click context menu.

You can also map by selecting one right-side item further down in the main tree to the left and, right-clicking on one left-side item in the List view and selecting the Map here option.

When you map two items together, a mapping item is created. The mapping items can be viewed in the main tree. In the below example, the mapping items are contained in a "Requirement Mapping Container".

| Note: If an "Invalid Part multiplicity: List (SetPart)." error is thrown when you attempt to map, contact a system Architect as this means the part type Multiplicity is set to "List" and not "Single". |
Removing an Existing Mapping
Existing mappings can be removed using both the Structure view and the List view.
| Note: When removed, if the mapping item is not being referenced anywhere else, it will be deleted from the server. |
In the Structure view, remove mappings one at a time using the Remove mapping button.

In the List view with the top item selected, right-click on the right-side item and select Remove mapping. Mappings can only be removed one at a time.

You can also remove a mapping by selecting one right-side or left-side item in the main tree to the left and, right-clicking on one of the mapped items in the List view and selecting the Remove mapping option.
Right-side Item Selected in Main Tree

Left-side Item Selected in Main Tree

Fixing Right Side Version
If an existing mapping contains a version of a right-side item that does not match the version of that item in the main tree structure, a version mismatch will occur as described above in Getting Acquainted with the View. To fix a right-side version, select the left and right items where there is a mismatch and click Fix right version. Version mismatches are handled one at a time.
In the below example, the version of "Emergency braking over 30 kph" in the mapping item is "1", but a version "2" exists in the main structure.

Fixing Left Side Version
In a similar way, if an existing mapping contains a version of a left-side item that does not match the version of that item in the main tree structure, a version mismatch will occur. To fix a left-side version, select the left and right items where there is a mismatch and click Fix left version. Version mismatches are handled one at a time.

Excluding an Item
When a mapping (container) only includes an item from the left or right side and not one item from both sides as in a normal mapping, the view considers the item as Excluded. In the below example, the mapping container "Emergency brake" contains only an item from the right side, and no item from the left side.

An item that is marked as Excluded is not to be considered when doing mapping work. The view ignores these items. You can use the view to exclude an unmapped item by right-clicking on it and selecting Exclude. At any time, you can chose to include it by selecting Include.

Filtering Options
Below the two models, you can select filters for different tasks, and you will learn that using these filters are essential to working efficiently with the view.

The filter options are described below.
Match: Selecting this filter will display only those items which are mapped to the item currently focused in the corresponding tree structure, i.e., those items for which the leftmost indication column is lit up.

Not mapped: Selecting this filter will display only those items that are not yet allocated, i.e., those items for which the mapping status column has red background color, with the text "Not mapped".
Version mismatch: Selecting this filter will display only those items that have been mapped, but a version inconsistency has appeared because one of the structures has been updated. This corresponds to the status column having the color yellow.

To - Version mismatch: This filter will display only those items that have been mapped, but where there is a version inconsistency because one of the structures has been updated. This corresponds to the status column having the color yellow.

Excluded: Selecting the Excluded filter will display only those items that are excluded in the mappings.

You can choose to select several filters at once in which case you will see those items satisfying at least one of the selected filters, i.e., you will see the union of satisfying result sets.

Handling Faulty Mappings
At some point during your work, models may change and, as a result of this, faulty mappings may appear. For example, a function requirement may be removed from the model after mappings between function and design requirements have already been made. When you select a left-hand or right-hand structure in the view, any problem mappings along with their Error type will display in the Faulty mappings section.

In the above example, the "ACC Regulate speed" design requirement has been removed from the model, but a mapping to it still exists. If it is no longer part of the scope, then the design requirement item can be removed from the mapping to resolve it. To do this, right-click and select Remove mapping.
