The purpose of the Fault Tree Analysis view is to support viewing and editing of so-called Fault Trees used in Fault Tree Analysis (FTA). The method is a top-to-bottom approach and is described in the Potential Failure Mode and Effects Analysis (FMEA) ISBN: 978-1-60534-136-1 and an overview of the notation can be found in Wikipedia. As mentioned in the introduction, the FTA meta model must exist in the database and the Fault Tree Graph extension must be installed. This article describes how to work with the view.
- Creating a Fault Tree
- Graphic Symbols
- Adding and Modifying Root Events and Logic Gates
- Adding and Modifying Events and Logic Gates
- Removing an Event or Gate
- Adding and Modifying Intermediate Nodes
- Reusing Events and Gates
- Viewing Options
- Exporting the Graph
Creating a Fault Tree
To create a new fault tree, you can use the New item option on the Items ribbon. With the new tree selected, the Fault Tree Analysis menu option activates for users. Open the view by clicking on the menu button. The view can also be opened via the View drop-down.

Once you have the root or "top-level" item created, you can begin creating the structure of events and logic gates. As with any other structure in SystemWeaver, this can be done using the structure tree context menu:

This article, however, will focus on using the interactive Graph view to build a fault tree.
Graphic Symbols
The basic symbols used in SystemWeaver's FTA are grouped into events, gates, and transfer symbols.
Event Symbols
Event symbols are used for primary events and intermediate events. Primary events are not further developed on the fault tree. Intermediate events are found at the output of a gate. The event symbols are shown below:
Fault Event

External Event

Intermediate Event

The primary event symbols are used as follows:
Basic event: failure or error in a system component or element (example: switch stuck in open position)
External event: normally expected to occur (not of itself a fault)
Gate Symbols
Gate symbols describe the relationship between input and output events. The symbols are derived from Boolean logic symbols:
OR gate
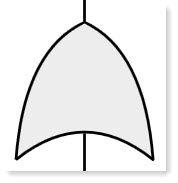
AND gate

The gates work as follows:
OR gate: the output occurs if any input occurs.
AND gate: the output occurs only if all inputs occur (inputs are independent).
Transfer-Out Symbol
The transfer-out symbol is used to identify the gates where the event is used as input.
Transfer out

Adding and Modifying Root Events and Logic Gates
Building the tree is done using a right-click context menu. The options available for use depend on which, or if, an object is selected.
In an initial empty structure, the context menu offers options for the root condition of the top event:

To get started, select the option that best suits your analysis.
Adding a New Root Fault Event
The Add new root Fault Event option creates a new failure or error event and includes it as the (single) root event. Note that the option is included for completeness only. Normally, a fault tree would not consist of a single event.

Adding New Root External Event
The Add new root External Event option creates a new external event item. An external event is an event that is normal and guaranteed or expected to occur. They are not considered to be faults, but still contribute to the generation of faults.

Adding a New Root Logic AND
The Add new root logic AND option creates a new AND gate and includes it as the root gate. An AND gate interconnects contributory events and conditions in the fault tree. The output occurs only if all inputs occur (inputs are independent). For a new AND gate, the proposed gate name is "AND", but it can be modified:

Adding a New Root Logic OR
The Add new root logic OR option creates a new OR gate and includes it as the root gate. An OR gate interconnects contributory events and conditions in the fault tree. The output occurs if any input occurs. For a new OR gate, the proposed gate name is "Or", but it can be modified:

Changing Gate Logic
To quickly change a gate logic from OR to AND or vice versa, select the gate, right-click and use the Change to [XXX] gate option:

Examples
A new root logic gate OR is added:

A new root fault event is added:

A new external event is added:

Adding and Modifying Events and Logic Gates
Just like with the creation of the root event and logic, when a gate is selected, the same tools are available for adding further events and logic leading up to the top event:

Removing an Event or Gate
To remove an event or gate at any time, select it and use the Remove from tree option on the context menu:

Adding and Modifying Intermediate Nodes
Intermediate events are found at the output of a gate. When a gate or event is selected, the following context menu options are available:
Adding an Intermediate Node
The Add intermediate node option is available when a gate does not have an output intermediate event already. It creates a new intermediate failure or error event.

Editing an Intermediate Node
When you edit an intermediate node, you are editing the event or gate that produces the intermediate node, not the intermediate event box. To edit an existing intermediate node, right-click the gate or event that has an output intermediate event and select Edit intermediate node.

Remove intermediate node is available for gates or events with an output intermediate event.
Reusing Events and Gates
Reuse of single events and gates including sub-trees is done by using the Copy and Paste as options in the Structure tree.

Note: Since the AND and OR gates "own" their input events, you always get the complete sub-tree under the gate when you reuse a gate.
Viewing Options
The graph view offers various viewing options via a right-click context menu. Without selecting an object, right-click in the white space of the view and make the selections that best fit your viewing needs.

The Auto Zoom option, if selected, will provide automatic adjustment of the zoom so that newly added gates or events will always be within the visual area of the view.
Tip: There is also a Zoom slider at the bottom right of the view. It offers zooming between 10% and 500%, with 100% as default.
The Show intermediate nodes option means that intermediate events will be shown in the graph:

The Show transfer-out symbols option turns on displaying of so-called transfer-out symbols:

If you hover over the transfer-out symbol, a hover-tip will identify the gates where the event is used as input:

The Show minimized form in dialog option opens a small dialog that presents the currently selected tree in a simplified predicate form:

Exporting the Graph
To export the fault tree graph as a .png or .xps file, click the Export Graph button at the bottom of the view.

What's Next?
Read about the FTA probability grid. Although more targeted for Architect users, you can find out more about the FTA meta model in Fault Tree Analysis (FTA) Meta Model and View.