Normally a report runs with one input, the selected item. Using parameters, you can add additional inputs to the report which enables making comparisons, seeing an item in a context, etc. A parameterized report enables you to provide information about an ”object” in its surroundings. In other words, you can select specific items to include in your report while excluding others. An example would be a single component in an architecture. Other possibilities are to select among alternative contexts where the item is used or to choose among "traceability links". This way a report can be based on multiple objects rather than a single, selected item thus making the Report view a good alternative to customized views. Without parameterizing a report, the information about a specific item can still be provided, but the scope given may be too big given that you are only really wanting to focus on one item. This articles explains how to configure parameterized reports.
- A Note on Parameters
- Declare a Parameter
- Assign Values to a Parameter
- Access the Chosen Value
- Following Parts Backwards Using ForEachPathReference
- What's Next?
| Tip: Parameters can also be used in graphs and grids. |
Prerequisites
- Familiar with the SystemWeaver meta model building blocks (e.g., Items, Parts and Attributes)
- Familiar with the SystemWeaver Explorer Interface and common operations
- Familiar with SystemWeaver Report Generation
- An installation of the SystemWeaver Explorer client (swExplorer)
- Knowledge of XML (A good resource is w3schools' XML tutorials)
- Assignment of the SW Architect role in the server
Example Meta Model
The below meta model is used in the examples provided.

A Note on Parameters
Parameters are variables. From a selected item in the structure tree, it's possible to follow parts up or down in the structure to collect variables (items/parts) that can be selected before generating the report.
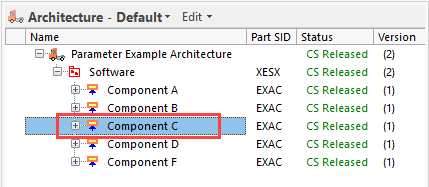
How does Component C interface with other components?

In SystemWeaver, you can set up a parameter selection menu, and then users can make a selection when they want to parameterize the report. To do this, you need to:
Declare a Parameter
<Parameter> declares the parameter. It has 6 attributes:
- caption is required, and sets the label for the parameter drop-down visible in the view.
- name is required, and is the identification of the parameter to be used when the selected value of a parameter is used in the report or view.
- type is optional, and can be used to define the type of parameter. Valid values are checkbox, textbox, and combobox. The default type is combobox.
- hintContextPathis optional, and can hold a list of part SIDs (ASID1;ASID2;...) that will define a default selection of an item in the current structure tree. The list works in the same way as paths in the tag ForEachPathReference.
(Since a common use of parameters is to select a specific context, any such context available in the structure tree is a more likely choice than some arbitrary context.)
- as is optional, and can be used to indicate a data type. Valid values are:
- Boolean
- String
- Date
- Integer
- Int64
- User
- Object
If as is not defined, it will default to "Item".
- defaultValue is optional and can be used to pre-select a value for users.
<Report>
   <Parameters>
     <Parameter caption="Component" name="comp"/>
   </Parameters>
.....
</Report>
Assign Values to a Parameter
To add values to the parameter selection drop-down list, use the <Values> and <AddValue> tags. In the below Architecture example, the "Components" (part SID=EXAC) have been defined as the values for the parameter called "comp". The part SID for "Software" is XESX.
<Report>
    <Parameters>
        <Parameter caption="Component" name="comp">

            <Values>
                <ForEachPart type="XESX">
                    <DefObj>
                        <ForEachPart type="EXAC">
                            <DefObj>
                                <AddValue/>
                            </DefObj>
                        </ForEachPart>
                    </DefObj>
                </ForEachPart>
            </Values>

        </Parameter>
    </Parameters>
</Report>
Note: Parameter values have to be items. This is the reason <DefObj> is used. |
Access the Chosen Value
In order to access the chosen value, parameters need to be accessed using a context (using the Context tag) or through the Path Query Language. In the below example, the chosen value is 'ParkingBrakeCtrl' (A). The context name is 'X' (B). The group attribute (C) defines how to access the context in the <ForEachInContext> tag.

<Report>
    <Parameters>
        <Parameter caption="Component" name="comp">
            <Values>
                <ForEachPart type="EXAC">
                    <DefObj>
                        <AddValue/>
                    </DefObj>
                </ForEachPart>
            </Values>
        </Parameter>
    </Parameters>
    <Context name="X"/>  (B)
    <ForEachInContext name="X" group="comp"> (C)
        <Text>#{Name}</Text>
    </ForEachInContext>
</Report>
The generated report for the above definition will look like this:

Building Virtual Tree for Context
For a parameterized report showing how a component interfaces with other components in the Architecture one must build the virtual tree for the context. In the below example, implicit connections are used.
All parts of interest must be added with the <AddParts/> tag. The tag is always applied with at least these four of the available attributes: owner, sid, part and defobj:
| Attribute | Description |
| owner | The group that owns the parts to be added. Owner can be previously defined as defobj or "main". Main is a default keyword for the entry item and is a group of one item, the selected item. Note: If the report or view has any Parameters defined, there will automatically be contexts defined corresponding to each parameter, using the name(s) of the parameter(s). |
| sid | The SID for the part of interest. |
| part | A name for the parts to be added. This can later be used to traverse the virtual context tree with for instance <ContextGoForward/> and <ContextGoBack/>. |
| defobj | A name for the group of items, that the parts are linked to. |
Example Context
<Context name="X">
  <AddParts owner="comp" sid="ITOS" part="compSendPort" defobj="compSignals"/>
  <AddParts owner="comp" sid="ITIS" part="compReceiveport" defobj="+compSignals"/>
</Context>
Note: In the example above, it is assumed that a parameter is involved. When a parameter is used, it will automatically become the selected item in the context. Therefore, it is not required to use main as a group name. |
For more information, see AddParts in the Script Language Reference Manual.

Following Parts Backwards Using ForEachPathReference
Above, parameters are used to drill down in an architecture to dig up relevant information about a single component. To see how the component interfaces with other components in another architecture, you can use <ForEachPathReference>.
<ForEachPathReference> is used to follow parts backwards rather than drilling down. It works similarly to the <ForEachItemReference> tag, but the performance is better.
In the below example, you could trace the references from the Application Component [BIAC] back to a top-level Architecture. The paths are XESX (A) and EXAC (B).
<Report>
    <Parameters>
        <Parameter caption="Architecture" name="arch" hintContextPath="XESX;EXAC">
            <Values>

                <ForEachPathReference path="XESX;EXAC">
                    <AddValue name="arch"/>
                </ForEachPathReference>

            </Values>
        </Parameter>
    </Parameters>
</Report>
The resulting Architecture selection drop-down includes all the other referenced architectures:

Asterisk
If you want to follow a specific part type an arbitrary number of times, add an asterisk ’*’ as shown below for path XESX:
<Report>
    <Parameters>
        <Parameter caption="Architecture" name="arch" hintContextPath="XESX;EXAC">
            <Values>

                <ForEachPathReference path="XESX*;EXAC">
                    <AddValue name="arch"/>
                </ForEachPathReference>

            </Values>
        </Parameter>
    </Parameters>
</Report>
Preselected Parameter Value
There are a couple of options for setting a preselected/default value for users so they do not have to select the parameter value themselves. See Setting a Default Value for a Parameter for more information and examples.
What's Next?
Learn more about using parameters in the SystemWeaver Script Language Reference Manual in the application Help, and in the following articles.